Apollo Connectors 소개와 사용법
현대 소프트웨어 개발에서 HTTP 기반 API를 생각하면 우리는 크게 두 가지 기술을 떠올리게 되죠? REST와 GraphQL.
역사가 오래된 REST는 비교적 간단한 백엔드 시스템이나 개발된 지 시간이 좀 지난 레거시 시스템에서 많이 사용되고 있습니다. 반면에 GraphQL은 관계가 복잡한 데이터를 다루는 API를 개발하거나 BFF(Backend for Frontend) 또는 API Orchestration(오케스트레이션)을 위해 많이 채택되고 있습니다.
만약 이 두 대표적인 API 기술을 유기적으로 통합할 수 있다면 얼마나 좋을까요? 이번 포스팅에서는 이러한 서버 개발자들의 오랜 꿈을 현실로 만들어주는 Apollo Connector에 대해 알아보겠습니다.
Apollo Connectors란?
Apollo Connectors는 오픈 소스 소프트웨어인 Apollo Server와 Apollo Client, 그리고 엔터프라이즈 플랫폼인 Apollo GraphOS로 유명한 기술 기업인 Apollo GraphQL에서 최근에 출시한 따끈따끈한 신기능입니다.
Apollo Connectors를 한 마디로 설명하자면 REST API를 GraphQL 서버없이 GraphQL API로 변환 및 통합할 수 있게 해주는 마법같은 도구라고 할 수 있겠는데요.
예전에는 레거시 REST API를 GraphQL API로 전환하려면 상당한 양의 코드를 작성해야했습니다. REST API의 엔드포인트를 직접 호출하여 GraphQL의 타입(type)과 필드(field)로 일일이 맵핑하는 로직을 구현해줘야 했었죠. 그래서 GraphQL이 좋은지 알면서도 마이그레이션 엄두를 못내는 경우가 있었습니다. 😢
하지만 Apollo Connectors를 사용하면 REST API를 너무나 쉽고 빠르게 GraphQL API로 변환할 수 있습니다. 새로운 GraphQL 서버를 구축하지 않고도 몇 줄의 스키마 선언만으로 REST API를 GraphQL로 바꿔버릴 수 있기 때문이죠. 🧙
Apollo Connectors의 가장 큰 장점은 기존 시스템을 대대적으로 개편하지 않고도 GraphQL을 점진적으로 도입할 수 있게 해준다는 것입니다. 뿐만 아니라, 한 회사에서 두 가지 기술의 API를 운영하면서 발생하는 비용을 최소화할 수 있으며, 장기적으로 아키택쳐를 단순화하고 통합된 API 전략을 수립하는데 도움이 될 수 있습니다.
그래프 생성
설명은 충분히 한 것 같으니 이제 본격적으로 함께 Apollo Connectors를 사용해보도록 할까요? 우선 Apollo Studio에 실습용으로 그래프를 하나 생성해야하는데요.
Apollo GraphQL에서 제공하는 CLI 도구인 Rover CLI를 설치하겠습니다. Rover CLI를 통해서 Apollo Studio에 있는 그래프를 제어할 수 있습니다.
$ curl -sSL https://rover.apollo.dev/nix/latest | sh터미널에서 빈 디렉토리를 만든 후, 그 안 들어가 그래프를 생성하기 위해서 rover init 명령어를 실행합니다.
처음 명령어를 실행하신다면 인증 위해 API 키를 입력하라고 나올 것입니다.
$ rover init
No credentials found. Please go to https://studio.apollographql.com/user-settings/api-keys and create a new Personal API key.

Copy the key and paste it into the prompt below.
>
아직 Apollo Studio의 계정이 없으신 분들은 무료 플랜으로 바로 회원 가입을 하실 수 있으며, API 키는 설정 페이지에서 생성할 수 있습니다.
유요한 API 키를 입력하면 인증에 성공할 것입니다.
$ rover init
No credentials found. Please go to https://studio.apollographql.com/user-settings/api-keys and create a new Personal API key.

Copy the key and paste it into the prompt below.

· ********
✓ Successfully saved your API key.
이제부터는 터미널에서 물어보는 질문에 차례대로 답변만 하면 됩니다.
$ rover init

Welcome! This command helps you initialize a federated graph in your current directory.

To learn more about init, run `rover init -h` or visit https://www.apollographql.com/docs/rover/commands/init

? Select option: Create a new graph
? Select an organization: DaleSchool
? Select use case: Start a graph with one or more REST APIs
? Name your graph: My API
Confirm or modify graph ID (start with a letter and use only letters, numbers, and dashes): my-api-zi31vaf

==> You’re about to create a local directory with the following files:

- .idea/.gitignore
- .idea/graphql-settings.xml
- .vscode/extensions.json
- README.md
- connectors_debugger.png
- getting-started.md
- products.graphql
- supergraph.yaml

? Proceed with creation? [Y/n]
y
마지막에 y를 입력하면 현재 디렉토리에 기본적인 프로젝트 파일이 생성됩니다.
✓ Successfully created files and generated GraphOS credentials.

=> All set! Your graph `My API` has been created. Please review details below to see what was generated.

Files created:
✓ .idea/.gitignore
✓ .idea/graphql-settings.xml
✓ .vscode/extensions.json
✓ README.md
✓ connectors_debugger.png
✓ getting-started.md
✓ products.graphql
✓ supergraph.yaml

GraphOS credentials for your graph
✓ APOLLO_GRAPH_REF=my-api-zi31vaf@current (Formatted graph-id@variant, references a graph in the Apollo GraphOS platform)
✓ APOLLO_KEY=service:my-api-zi31vaf:VyShE1SH6WbGYch12SZhcg (This is your graph’s API key)

▲ Before you proceed:
- Store your graph API key securely, you won’t be able to access it again!

Next steps
Run the following command to start a local development session:

APOLLO_KEY=service:my-api-zi31vaf:VyShE1SH6WbGYch12SZhcg rover dev --graph-ref my-api-zi31vaf@current --supergraph-config supergraph.yaml

For more information, check out `getting-started.md`.
그리고 Apollo Studio에 생성된 그래프의 정보와 rover dev 명령어로 그래프를 실행하는 방법이 나옵니다.
이 부분은 나중에 필요하니 복사해서 메모장 같은 곳에 붙여넣기 해놓습니다.
스키마 작성
이제부터 REST API를 연결하기 위한 GraphQL 스키마를 작성하겠습니다. 그럴려면 GraphQL API로 변환할 REST API가 필요한데요.
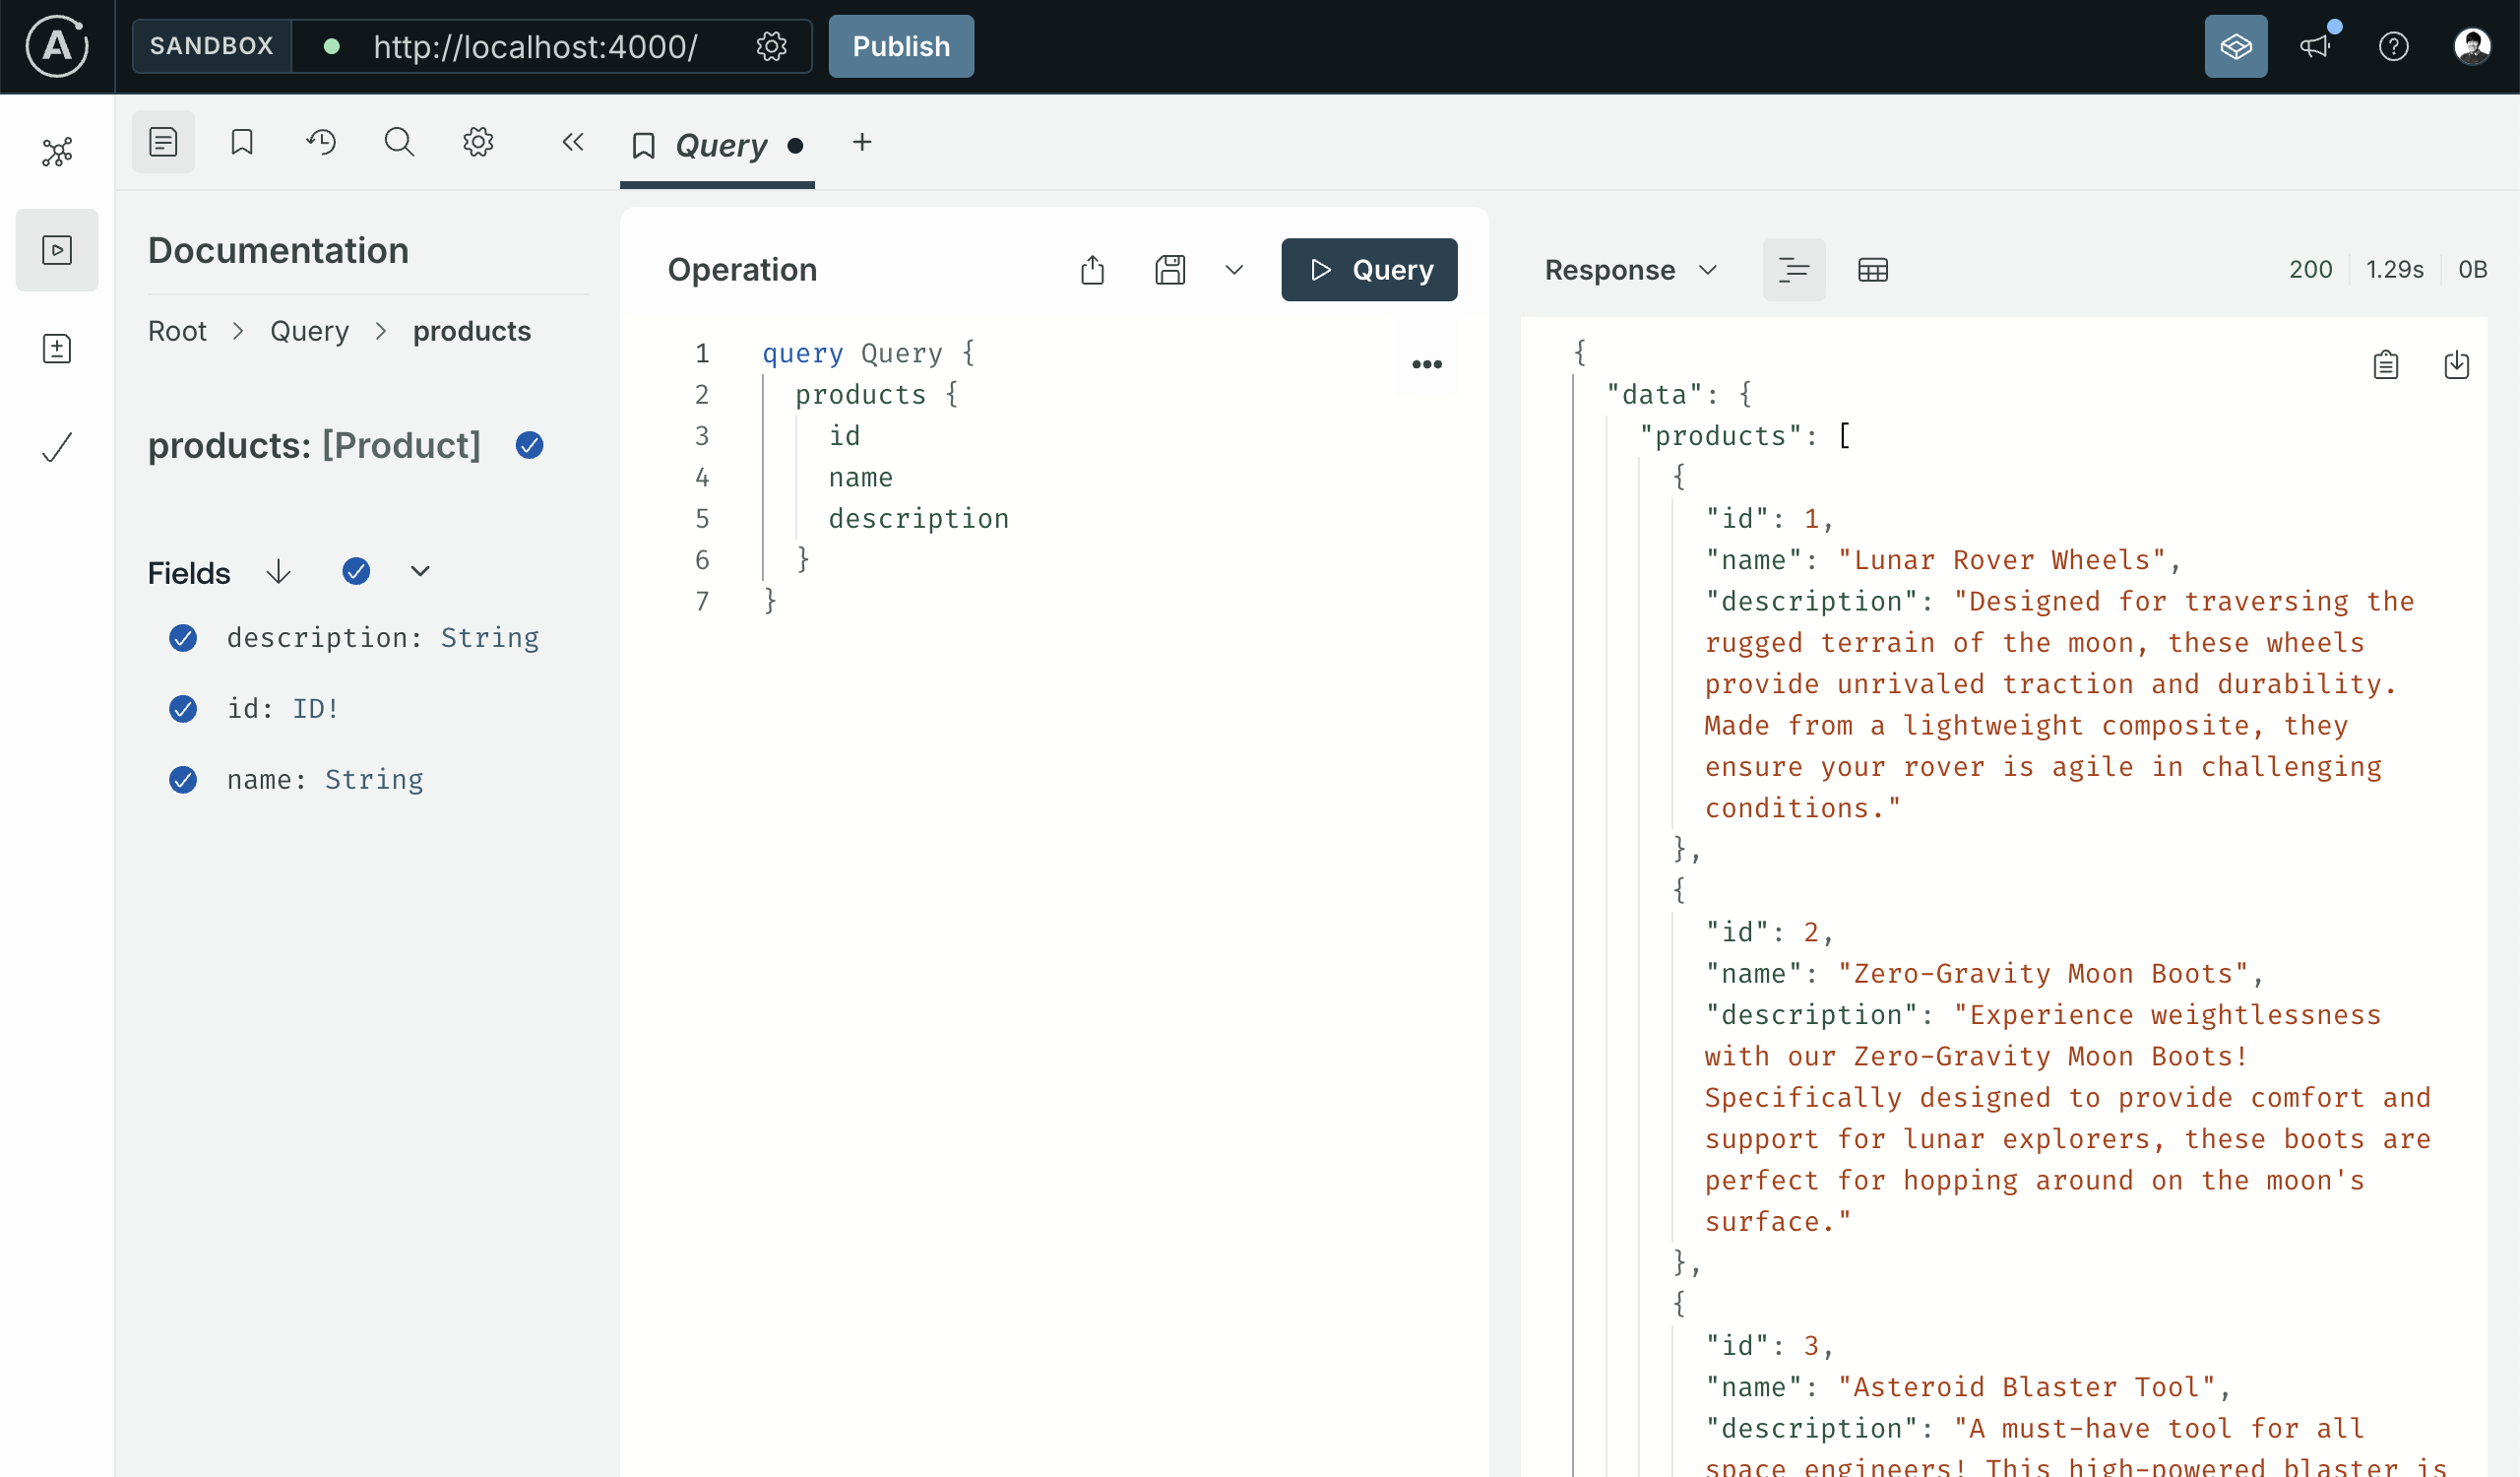
외부에 공개되어 있는 전자 상거래 REST API로 실습을 진행하겠습니다. 아래와 같은 형태로 가짜 상품 정보를 응답하는 API입니다.
{
  "products": [
    {
      "id": 1,
      "name": "Lunar Rover Wheels",
      "createdAt": 1636742972000,
      "updatedAt": 1636742972000,
      "description": "Designed for traversing the rugged terrain of the moon, these wheels provide unrivaled traction and durability. Made from a lightweight composite, they ensure your rover is agile in challenging conditions.",
      "slug": "lunar-rover-wheels",
      "tags": [
        { "tagId": "space", "name": "Space" },
        { "tagId": "engineering", "name": "Engineering" },
        { "tagId": "rover", "name": "Rover" }
      ],
      "category": "Engineering Components",
      "availability": "AVAILABLE"
    }
    // (... 생략 ...)
  ],
  "summary": { "total": 30 }
}Apollo Connectors는 GraphQL의 필드(field)나 타입(type)에 REST API의 엔드포인트(endpoint)를 연결할 수 있는 선언적(declarative) 방법을 제공하는데요.
GraphQL 스키마 안에서 @connect와 @source 지시문을 통해서 GraphQL과 REST 간의 맵핑이 이뤄집니다.
products.graphql 파일을 열고 기존에 있던 예제 스키마를 지우고 처음부터 GraphQL 스키마를 함께 작성해보도록 하겠습니다.
Apollo Connectors는 Apollo Federation 스펙을 기반으로 합니다. 따라서 이 부분을 스카마 파일 제일 위에 명시해줘야 하고요.
extend schema
  # Apollo Federation 스펙을 사용한다고 명시합니다.
  @link(url: "https://specs.apollo.dev/federation/v2.10")
그 다음 Apollo Connectors에서 제공하는 @connect와 @source 지시문을 불러옵니다.
  # @connect와 @source 지시문을 불러옵니다.
  @link(
    url: "https://specs.apollo.dev/connect/v0.1"
    import: ["@connect", "@source"]
  )
그리고 @source 지시문을 통해서 연결할 REST API의 이름(name)과 기본 URL(baseUrl)을 명시해줍니다.
  # @source 지시문으로 REST API를 데이터 소스로 정의할 수 있습니다.
  @source(
    name: "ecomm"
    http: { baseURL: "https://ecommerce.demo-api.apollo.dev/" }
  )
다음으로 REST API에서 제공하는 상품 정보를 나타내는 타입을 정의합니다. 실제 REST API의 응답을 보면 상품은 많은 필드로 구성이 되어 있는데요. 저희는 최대한 간단한 실습을 위해서 그 중에서 3개의 필드만 포함해도 괜찮을 것 같습니다.
type Product {
  id: ID!
  name: String
  description: String
}
마지막으로 GraphQL API에 모든 상품 목록을 요청할 수 있도록 products 쿼리(query)를 정의하겠습니다.
product 필드 아래에 @connect 지시문을 사용하여 REST API 엔드포인트를 연결해줍니다.
source:@source지시문으로 정의해둔 데이터 소스http: 엔드포인트 (HTTP 방식, URL 경로)selection: HTTP 응답에서 선택할 필드
type Query {
  products: [Product]
    # @connect 지시문은 GraphQL 필드나 타입에 REST API 엔드포인트를 연결합니다.
    @connect(
      source: "ecomm"
      http: { GET: "/products" }
      selection: """
      $.products {
        id
        name
        description
      }
      """
    )
}
자, 이렇게 @connect와 @source 지시문을 사용해서 GraphQL 스키마만 작성해주면 끝입니다.
다른 프로그래밍 언어를 사용하여 별도의 GraphQL 서버 코드를 작성할 필요가 전혀 없습니다.
그래프 실행
마지막으로 변환된 GraphQL API를 로컬에서 구동해볼 차례입니다.
위에서 복사해둔 rover dev 명령어를 터미널에 붙여넣고 실행하면 끝입니다.
$ APOLLO_KEY=service:my-api-zi31vaf:VyShE1SH6WbGYch12SZhcg \
  rover dev --graph-ref my-api-zi31vaf@current --supergraph-config supergraph.yaml

** Notice: Changes in This Release! **
This version includes significant updates to the `rover dev` command.
We highly recommend reviewing the updated documentation to ensure a smooth experience.
Read more: https://www.apollographql.com/docs/rover/commands/dev

warning: Do not run this command in production! It is intended for local development only.

merging supergraph schema files
supergraph config loaded successfully
starting a session with the 'products' subgraph
==> Watching /Users/daleseo/temp/my-graph-z4j7yc/products.graphql for changes
composing supergraph with Federation 2.10.0
==> Attempting to start router at http://localhost:4000.
WARN: setting resource attributes is not allowed for Apollo telemetry
==> Health check exposed at http://127.0.0.1:8088/health
WARN: Connector debugging is enabled, this may expose sensitive information.
==> Your supergraph is running! head to http://localhost:4000 to query your supergraph
브라우저에서 http://localhost:4000/에 접속하시면 변환된 GraphQL API를 테스트해볼 수 있는 Sandbox 웹사이트가 열릴 것입니다.
실습 코드
본 포스팅에서 작성한 GraphQL 스키마는 아래에서 직접 확인하고 실행해볼 수 있습니다.
마치며
지금까지 REST API를 GraphQL 서버없이 GraphQL API로 바꿔주는 마법같은 도구인 Apollo Connectors에 대해서 살펴보았습니다. Apollo Connectors 통해 최소한의 비용으로 REST API와 GraphQL API를 통합하시고 진정한 API Orchestration을 혜택을 누릴 수 있으셨으면 좋겠습니다.
Apollo Connectors에 대한 좀 더 배우시고 싶으신 분들께는 아래 Apollo GraphQL의 공식 문서를 추천드리겠습니다.
This work is licensed under CC BY 4.0![]()
![]()